Pages

Showing posts with label Christmas tree. Show all posts

1/5/12

Wood Chip Tree Tutorial


Materials:
  • 2 Styrofoam Cones, two different sizes
  • Hot Glue
  • Wood Chips (Grilling section at True Value)
  • PVC pipe fittings, 2 different sizes
  • Krylon Fusion for Plastic spray paint (sparkly brown)
  • Paint, stain or dye
  • Small Star (holiday pick from craft store)
Tutorial:
1. Spray PVC pipe fittings. Let dry.
2. Attach pipe fittings to bottom of styrofoam cones with hot glue.
3. Using hot glue and starting at the bottom, glue wood chips around the Styrofoam cone.
4. Continue working upwards in layers. Find the right pieces is like putting together a puzzle. I liked using pieces with bark for texture.
Note: The Weber wood chips were cut on an angle. Gluing the angle and attaching to the cone, made the chip stand out a little.
Note: Thin wood chips can be snapped which is helpful for placing on curved surface.
5. Paint or stain the wood chips and let dry.
6. Add star to top by poking wire into Styrofoam or secure with hot glue. Embellish if desired.
My inspiration was the West Elm seagrass tree but due to a shortage of sea grass in western PA, mine turned out different but not in a bad way…
Simple. Pretty. Natural.

Found Here:
DIY Holiday Highlights Linky Party and Styrofoam Wood Chip Tree Tutorial | DIY Show Off

12/29/11

Chile and Cheese Spirals


chili and cheese spirals 2 450

chili and cheese spirals 4 450
Chile and Cheese Spirals
  • 4 ounces cream cheese, softened
  • 1 cup shredded mild cheddar cheese
  • ½ cup (4 ounce can) diced green chiles
  • ½ cup (about 3) sliced green onion
  • ½ cup chopped red bell pepper
  • ¼ cup chopped ripe olives
  • 4 (8-inch) soft taco-sized flour tortillas (the green ones I get are 12 inch so I only use 3)
  • Salsa
  1. Combine cream cheese, cheddar cheese, chiles, green onion, red pepper, and olives in a medium bowl.
  2. Spread ½ cup cheese mixture over each tortillas; roll up.
  3. Wrap each roll in plastic wrap twisting ends to close; refrigerate for 1 hour.
  4. Remove plastic wrap; slice each roll into ¾ inch pieces.
  5. Serve with salsa for dipping.

Found Here:
Chile and Cheese Spirals | Real Mom Kitchen

11/30/11

DIY Christmas Topiaries

Twine Christmas Tree Topiary from The Thrifty Crafter


The Thrifty Crafter has has a couple of Christmas topiary tutorials on her blog that I love. The first is this twine wrapped Christmas tree topiary and the second is the red berry tree topiary. Both would make beautiful centerpieces for Christmas. I am adding these to the collection of Christmas topiaries I love, inlcuding this gorgeous white felt Christmas tree from Bliss Bloom Blog:


The glitter tree topiary from Eighteen25:


The edible Christmas tree topiary from Jeanne Bennedict:


And the fabric tree topiaries from The Pleated Poppy:


Found on:
DIY Christmas Topiaries ~ Be Different...Act Normal

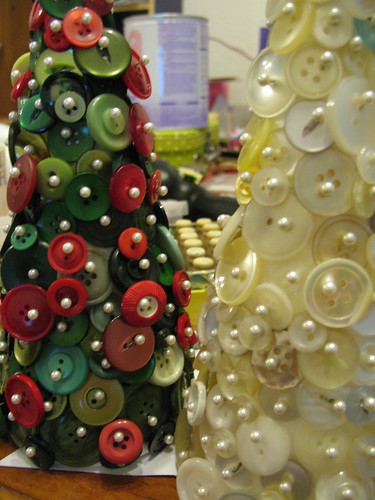
button christmas trees


Red & White Button Christmas Trees

Button Christmas Tree All Red


Button Christmas Tree Framed

Button Christmas Tree Red & Green
Source: bhg.com via Cheryl on Pinterest

Button Christmas Tree Craft

Button Christmas Tree Framed, Vintage look


Button Christmas Tree Framed,


Button Christmas Tree, Vintage look

11/25/11

The Ellusive Cone

cone trees

the ellusive cone

For the complete post & the web site I found these gorguse things on, scroll to the bottom & click the link. :)

This is one of those unintentional projects that seem to plague my creative world. The basics of this started brewing over a year ago. Last Christmas I made some party cone baskets. They were my first attempt and and I didn’t have a real pattern. They were shallow and wide, but kind of irregular. For most projects I would mind irregular, after all, I can kinda relate. But I’d rather save the unique-ness for the embellishing on this one. This was the old project:

This year I wanted to make trees out of cones. I searched everywhere for a basic pattern but while I could find instructions for making them, and even some descriptions on math sites, I could not find a simple print and cut pattern. You’d think that a project as old as this, from crafting days of yore, would be around somewhere, but I couldn’t find it. Even Martha let me down. So I broke down and made one. It was an excruciating 5 minutes. Which leads me to believe that last year I *might* have made it a bit harder than it needed to be.
So now I have a basic pattern that could use for either a tree or cone. But did I stop there? Oh, no.
I’ve also been toying with printing a pattern on one side of paper and cutting parts of it out and sort of pushing edges up to make different embossed effects. Kirigami comes to mind, but my project is less about folding than cutting, as you will see. (I’m sure it has a name and one of my readers will enlighten me. You are a smart bunch!)
So this is what I ended up with.

I printed the pattern on the reverse side of paper but it would be done on white as well. I resized each one so they are all different. This pattern fits well on a 8 1/2 x 11 sheet of paper.
I also cut the snowflakes out differently on each cone using an exacto knife. For example, on one cone I cut all of the lines, on another one I cut only the points, on the final cone I cut a mix of points and lines but not everything…you get the picture. My purpose was to have different effects from the same pattern. Cheating. Yes. But I am lazy about that sort of thing. Why make multiple patterns when we can just look at the same pattern differently?

Once I got the designs all cut I decided to play and embellish them. I just used adhesive/tape runner to stick the flap down inside the cone. (Learn from my mistake: do not score or fold the tab. It makes the tree all wonky.)
Here I will note that most embellishments work best on an assembled cone. I embellished with little flowers, colored bling, bling flourishes, pipecleaners, and stickles. I also thought about using glitter but didn’t get a chance to…yet.
After my cones were finished I started thinking about what a waste it was to not light them from within so that all the detail would show. I’ve seen little battery operated tea lights around a lot this year, and they are perfect for this because they don’t heat up. It’s important that you don’t use lights that will get hot because come on, it’s paper! I’m not even going to mention candles.

I was thrilled when I added the lights. Even the patterns on the paper showed through. Lovely is an understatement.
So there you have it. Some trees for your reindeer, or cones for your home. At any rate, super cheap decorations that were a lot of fun to make and the kiddies can decorate, too.
Enjoy.

Found here:
the ellusive cone « Cheeky Magpie

11/10/11

Christmas Trees


These are some beautiful photos of Christmas trees. I found these Christmas tree photos on the internet, Pinterest or just Google. Love all these ideas for decorating.


Blue & silver with lots of lights, Pretty.

Another red & white Christmas tree.

Kitchen theme decorated Christmas tree.
Source: hgtv.com via Pam on Pinterest

I've herd of hanging Christmas trees. Here's a ornament only Hanging Christmas tree. That's a different idea!!

Lollipop decorated Christmas tree. Sooo cute!!!

And yet another red & white decorated Christmas tree. This one is in a log cabin & looks beautiful.

Blue Christmas tree. Not something I would think to do, but it s beautiful..
Source: google.com via Gwen on Pinterest

A non- Christmas tree, made with lights, always good for outside.

Decorated ladder Christmas tree. How fun is this!!!
Source: blog.cb2.com via P on Pinterest

Oh Christmas Tree, oh Christmas Tree

White decorated Christmas tree